Reverse Proxy Configuration
A reverse proxy is a server that sits between users and your NetAlertX instance. It allows you to:
- Access NetAlertX via a domain name (e.g., https://netalertx.example.com).
- Add HTTPS/SSL encryption.
- Enforce authentication (like SSO).
flowchart LR
  Browser --HTTPS--> Proxy[Reverse Proxy] --HTTP--> Container[NetAlertX Container]
NetAlertX Ports
NetAlertX exposes two ports that serve different purposes. Your reverse proxy can target one or both, depending on your needs.
| Port | Service | Purpose |
|---|---|---|
| 20211 | Nginx (Web UI) | The main interface. |
| 20212 | Backend API | Direct access to the API and GraphQL. Includes API docs you can view with a browser. |
Warning
Do not document or use /server as an external API endpoint. It is an internal route used by the Nginx frontend to communicate with the backend.
Connection Patterns
1. Default (No Proxy)
For local testing or LAN access. The browser accesses the UI on port 20211. Code and API docs are accessible on 20212.
flowchart LR
  B[Browser]
  subgraph NAC[NetAlertX Container]
    N[Nginx listening on port 20211]
    A[Service on port 20212]
    N -->|Proxy /server to localhost:20212| A
  end
  B -->|port 20211| NAC
  B -->|port 20212| NAC
2. Direct API Consumer (Not Recommended)
Connecting directly to the backend API port (20212).
Caution
This exposes the API directly to the network without additional protection. Avoid this on untrusted networks.
flowchart LR
  B[Browser] -->|HTTPS| S[Any API Consumer app]
  subgraph NAC[NetAlertX Container]
    N[Nginx listening on port 20211]
    N -->|Proxy /server to localhost:20212| A[Service on port 20212]
  end
  S -->|Port 20212| NAC
3. Recommended: Reverse Proxy to Web UI
Using a reverse proxy (Nginx, Traefik, Caddy, etc.) to handle HTTPS and Auth in front of the main UI.
flowchart LR
  B[Browser] -->|HTTPS| S[Any Auth/SSL proxy]
  subgraph NAC[NetAlertX Container]
    N[Nginx listening on port 20211]
    N -->|Proxy /server to localhost:20212| A[Service on port 20212]
  end
  S -->|port 20211| NAC
4. Recommended: Proxied API Consumer
Using a proxy to secure API access with TLS or IP limiting.
Why is this important?
The backend API (:20212) is powerful—more so than the Web UI, which is a safer, password-protectable interface. By using a reverse proxy to limit sources (e.g., allowing only your Home Assistant server's IP), you ensure that only trusted devices can talk to your backend.
flowchart LR
  B[Browser] -->|HTTPS| S[Any API Consumer app]
  C[HTTPS/source-limiting Proxy]
  subgraph NAC[NetAlertX Container]
    N[Nginx listening on port 20211]
    N -->|Proxy /server to localhost:20212| A[Service on port 20212]
  end
  S -->|HTTPS| C
  C -->|Port 20212| NAC
Getting Started: Nginx Proxy Manager
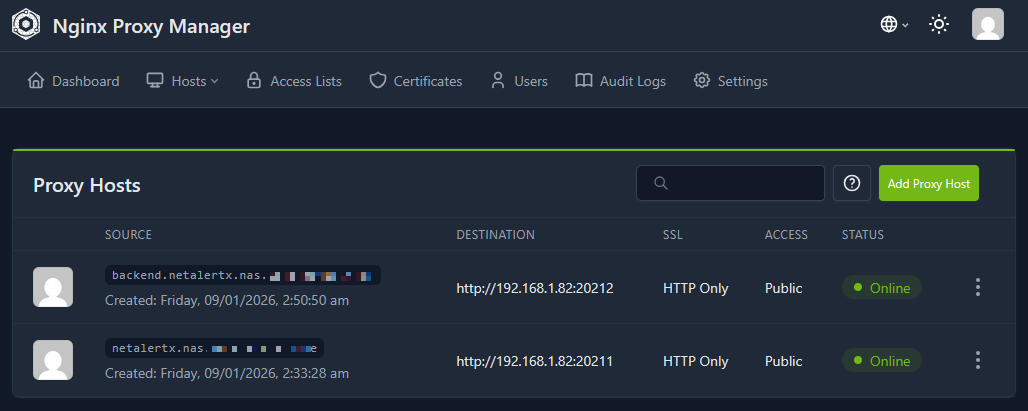
For beginners, we recommend Nginx Proxy Manager. It provides a user-friendly interface to manage proxy hosts and free SSL certificates via Let's Encrypt.
- Install Nginx Proxy Manager alongside NetAlertX.
- Create a Proxy Host pointing to your NetAlertX IP and Port
20211for the Web UI. - (Optional) Create a second host for the API on Port
20212.
Configuration Settings
When using a reverse proxy, you should verify two settings in Settings > Core > General:
- BACKEND_API_URL: This should be set to
/server. -
Reason: The frontend should communicate with the backend via the internal Nginx proxy rather than routing out to the internet and back.
-
REPORT_DASHBOARD_URL: Set this to your external proxy URL (e.g.,
https://netalertx.example.com). - Reason: This URL is used to generate proper clickable links in emails and HTML reports.

Other Reverse Proxies
NetAlertX uses standard HTTP. Any reverse proxy will work. Simply forward traffic to the appropriate port (20211 or 20212).
For configuration details, consult the documentation for your preferred proxy:
Authentication
If you wish to add Single Sign-On (SSO) or other authentication in front of NetAlertX, refer to the documentation for your identity provider:
Further Reading
If you want to understand more about reverse proxies and networking concepts: