Performance Optimization Guide
There are several ways to improve the application's performance. The application has been tested on a range of devices, from Raspberry Pi 4 units to NAS and NUC systems. If you are running the application on a lower-end device, fine-tuning the performance settings can significantly improve the user experience.
Common Causes of Slowness
Performance issues are usually caused by:
- Incorrect settings – The app may restart unexpectedly. Check
app.logunder Maintenance → Logs for details. - Too many background processes – Disable unnecessary scanners.
- Long scan durations – Limit the number of scanned devices.
- Excessive disk operations – Optimize scanning and logging settings.
- Maintenance plugin failures – If cleanup tasks fail, performance can degrade over time.
The application performs regular maintenance and database cleanup. If these tasks are failing, you will see slowdowns.
Database and Log File Size
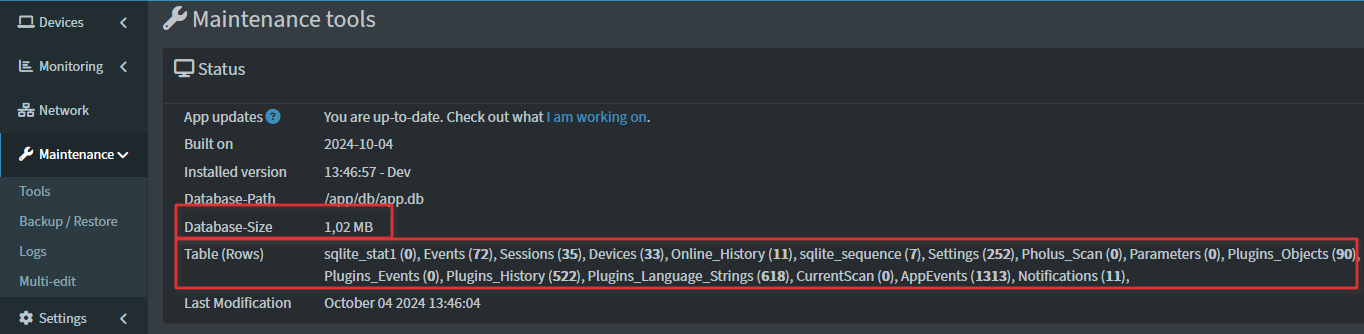
A large database or oversized log files can impact performance. You can check database and table sizes on the System Info → Storage page.
Note
- For ~100 devices, the database should be around 50 MB.
- No table should exceed 10,000 rows in a healthy system.
- Actual values vary based on network activity and plugin settings.
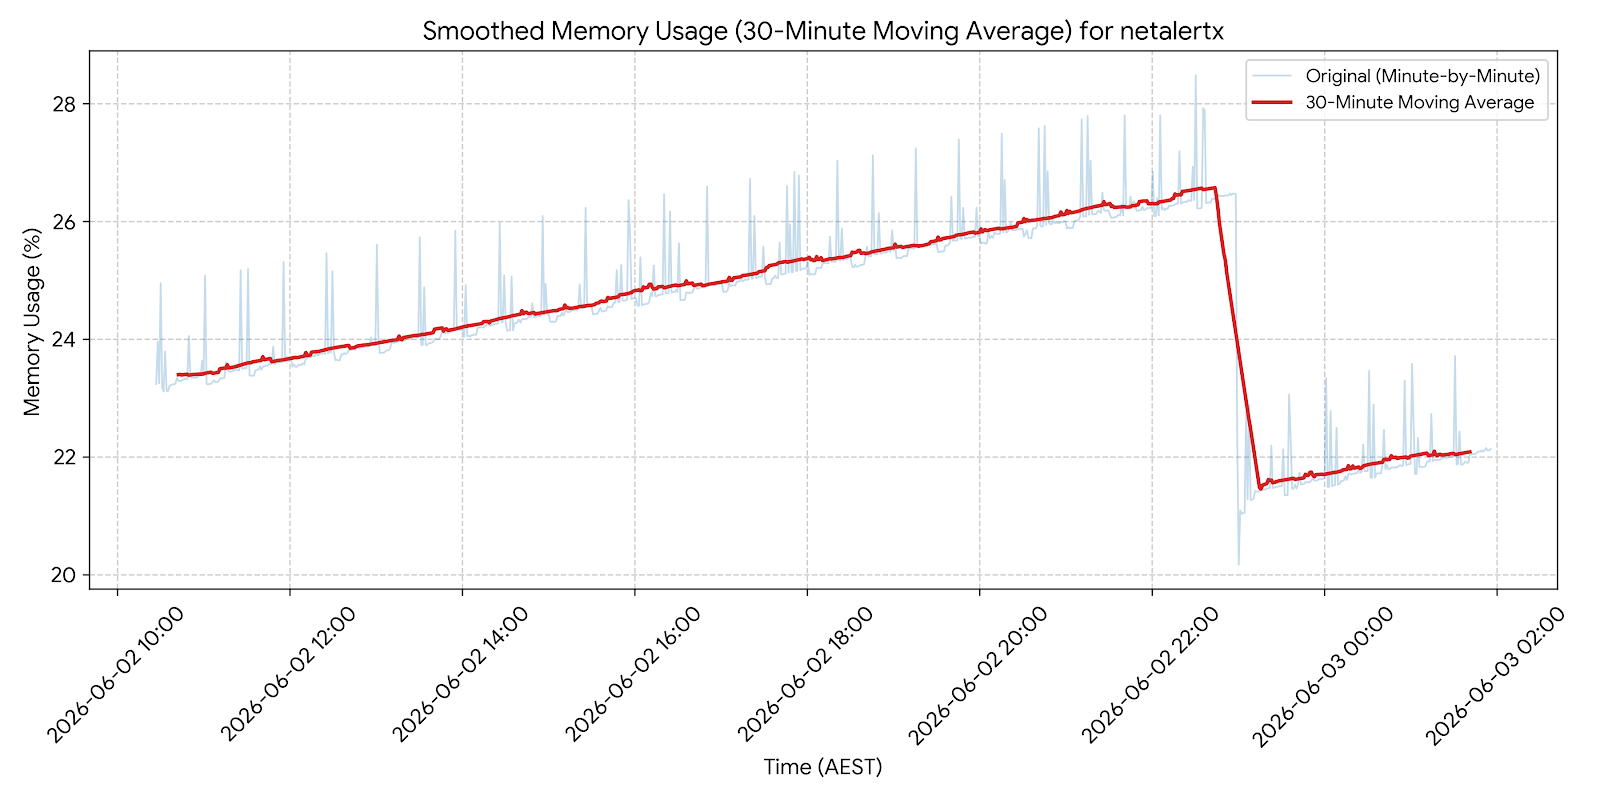
Please note that excessively large log files will increase memory consumption. Decrease MAINT_LOG_LENGTH if you want to optimize memory use and increase it when debugging issues. See below chart on memory use after logs cleanup.
Tracking NetAlertX's Own Resource Usage Over Time
The System Info → Performance page graphs NetAlertX's own process CPU%, memory, disk I/O, and scan duration over hour/day/week/month ranges, sampled once per scan cycle. This turns "did a recent change make things slower" into a question you can answer by looking at real history, instead of guessing from what a change should cost.
What each chart shows:
- CPU % - average CPU utilisation over the scan cycle (
100%= one fully-utilized CPU core; can exceed100%with multi-threaded work). This is an average over the whole cycle, not an instantaneous reading - a short burst of high usage followed by idle time reads as a lower percentage than the peak. - Memory Usage - resident memory (RSS - the physical RAM the process currently holds), in MB, sampled once per cycle.
- IO Read / IO Write - bytes read/written by the NetAlertX process itself during that cycle, in MB. This only ever reflects NetAlertX's own direct I/O (its own DB/cache writes) - a plugin's own subprocess doing heavy disk I/O (e.g. a scanner writing its own result file) is not captured; this is a structural limitation of how the OS attributes child-process I/O to the parent, not a gap that can be closed later.
- Scan Duration - wall-clock time the scan cycle took, in seconds.
Note
The IO numbers come from the kernel's own per-process I/O accounting (/proc/<pid>/io), which the kernel itself documents as an approximation. On some Docker storage drivers this can be badly inaccurate - confirmed on the deprecated aufs driver (common on older Synology NAS Docker setups), where union-filesystem copy-up writes get mis-attributed and can report write volumes many times larger than what's actually reaching disk (docker info | grep -i "storage driver" shows which driver you're on; aufs is a known-bad case, alongside its own blkio throttle warnings confirming the kernel's block-I/O accounting isn't properly wired up for it). If the IO chart shows large, consistent write numbers that don't match actual database growth (check the DB/WAL size on System Info → Storage), that's this known driver limitation, not a real cost. Newer Docker storage drivers (overlay2) don't have this problem.
- Controlled by the
MAINT_PERF_DAYSsetting (part of theMAINTplugin) - the number of days of history to retain,0disables collection. Defaults to30. - History cannot be backfilled - data starts accumulating from whenever collection is enabled.
GET /healthalso exposes liveprocess_cpu_pct/process_rss_mbfields for external monitoring, independent of this history.
Maintenance Plugins
Two plugins help maintain the system’s performance:
1. Database Cleanup (DBCLNP)
- Handles database maintenance and cleanup.
- See the DB Cleanup Plugin Docs.
- Ensure it’s not failing by checking logs.
- Adjust the schedule (
DBCLNP_RUN_SCHD) and timeout (DBCLNP_RUN_TIMEOUT) if necessary.
2. Maintenance (MAINT)
- Cleans logs and performs general maintenance tasks.
- See the Maintenance Plugin Docs.
- Verify proper operation via logs.
- Adjust the schedule (
MAINT_RUN_SCHD) and timeout (MAINT_RUN_TIMEOUT) if needed.
Database Performance Tuning
The application automatically maintains database performance as data accumulates. However, you can adjust settings to balance CPU usage, disk usage, and responsiveness.
WAL Size Tuning (Storage vs. CPU Tradeoff)
The SQLite Write-Ahead Log (WAL) is a temporary file that grows during normal operation. On systems with constrained resources (NAS, Raspberry Pi), controlling WAL size is important.
Setting: PRAGMA_JOURNAL_SIZE_LIMIT (default: 50 MB)
| Setting | Effect | Use Case |
|---|---|---|
| 10–20 MB | Smaller storage footprint; more frequent disk operations | NAS with SD card (storage priority) |
| 50 MB (default) | Balanced; recommended for most setups | General use |
| 75–100 MB | Smoother performance; larger WAL on disk | High-speed NAS or servers |
Recommendation: For NAS devices with SD cards, leave at default (50 MB) or increase slightly (75 MB). Avoid very low values (< 10 MB) as they cause frequent disk thrashing and CPU spikes.
Automatic Cleanup
The DB cleanup plugin (DBCLNP) automatically optimizes query performance and trims old data:
- Deletes old events – Controlled by
DAYS_TO_KEEP_EVENTS(default: 90 days) - Trims plugin history – Keeps recent entries only (controlled by
PLUGINS_KEEP_HIST) - Optimizes queries – Updates database statistics so queries remain fast
If cleanup fails, performance degrades quickly. Check Maintenance → Logs for errors. If you see frequent failures, increase the timeout (DBCLNP_RUN_TIMEOUT).
Scan Frequency and Coverage
Frequent scans increase resource usage, network traffic, and database read/write cycles.
Optimizations
- Increase scan intervals (
<PLUGIN>_RUN_SCHD) on busy networks or low-end hardware. - Increase timeouts (
<PLUGIN>_RUN_TIMEOUT) to avoid plugin failures. - Reduce subnet size – e.g., use
/24instead of/16to reduce scan load. - Enable the deep sleep setting (
DEEP_SLEEP) – Lowers CPU usage by extending idle wait times between processing cycles. When enabled, scans may be delayed by up to 1 minute and the UI might become less responsive.
Some plugins also include options to limit which devices are scanned. If certain plugins consistently run long, consider narrowing their scope.
For example, the ICMP plugin allows scanning only IPs that match a specific regular expression.
Plugin Field Authority: SET_ALWAYS and SET_EMPTY
Plugins can be configured to control how aggressively they overwrite existing device field values via two settings:
| Setting | Behaviour |
|---|---|
<PLUGIN>_SET_ALWAYS |
Plugin always overwrites the field, as long as it can resolve a value and the field is not USER/LOCKED |
<PLUGIN>_SET_EMPTY |
Plugin only writes when the field is currently empty |
Both settings accept a list of field names (e.g., devName, devFQDN). See Name resolution and Field locking docs for details.
Performance Impact of SET_ALWAYS on Name Resolution
By default, name resolution (DIGSCAN, NBTSCAN, NSLOOKUP, AVAHISCAN) only runs against devices that have no name yet. This keeps DNS query volume proportional to new devices discovered, not the total inventory.
When any name-resolution plugin has devName in its SET_ALWAYS list, the system additionally runs a second resolution pass against all devices whose name is not USER/LOCKED protected. This allows a higher-priority plugin (e.g., DIGSCAN) to overwrite names previously set by a lower-priority one (e.g., NBTSCAN).
Cost: one DNS query per unprotected, already-named device per name-resolution cycle.
| Scenario | Devices resolved per cycle |
|---|---|
No SET_ALWAYS on devName |
Only new/unknown devices |
SET_ALWAYS: devName on any plugin |
New/unknown devices + all unprotected named devices |
Warning
On large installations (thousands of devices), enabling SET_ALWAYS: devName significantly increases DNS query volume and cycle duration. To mitigate:
- Increase the scan interval of name-resolution plugins (
DIGSCAN_RUN_SCHD,NBTSCAN_RUN_SCHD, etc.). - Mark devices whose name should never change as
USERorLOCKED— they are excluded from the re-resolve pass entirely. - Use
SET_ALWAYSonly on the highest-priority plugin; leave lower-priority plugins without it.
The actual number of DB rows updated is logged at verbose level under [Update Device Name] SET_ALWAYS re-resolve - DB rows updated.
Disable change log tracking
To improve performance, you can reduce or disable change log tracking. Use the DEV_HIST_TRACKED setting to limit tracking to specific columns, and adjust DEV_HIST_DAYS to control how long history is retained. Setting DEV_HIST_DAYS to 0 disables history tracking entirely.
Storing Temporary Files in Memory
On devices with slower I/O, you can improve performance by storing temporary files (and optionally the database) in memory using tmpfs.
Warning
Storing the database in tmpfs is generally discouraged. Use this only if device data and historical records are not required to persist. If needed, you can pair this setup with the SYNC plugin to store important persistent data on another node. See the Plugins docs for details.
Using tmpfs reduces disk writes and speeds up I/O, but all data stored in memory will be lost on restart.
Below is an optimized docker-compose.yml snippet using non-persistent logs, API data, and DB:
services:
  netalertx:
    container_name: netalertx
    # Use this line for the stable release
    image: "ghcr.io/netalertx/netalertx:latest"
    # Or use this line for the latest development build
    # image: "ghcr.io/netalertx/netalertx-dev:latest"
    network_mode: "host"
    restart: unless-stopped

    cap_drop:       # Drop all capabilities for enhanced security
      - ALL
    cap_add:        # Re-add necessary capabilities
      - NET_RAW
      - NET_ADMIN
      - NET_BIND_SERVICE
      - CHOWN
      - SETUID
      - SETGID

    volumes:
      - ${APP_FOLDER}/netalertx/config:/data/config
      - /etc/localtime:/etc/localtime:ro

    tmpfs:
      # All writable runtime state resides under /tmp; comment out to persist logs between restarts
      - "/tmp:uid=20211,gid=20211,mode=1700,rw,noexec,nosuid,nodev,async,noatime,nodiratime"
      - "/data/db:uid=20211,gid=20211,mode=1700"  # ⚠ You will lose historical data on restart

    environment:
      - PORT=${PORT}
      - APP_CONF_OVERRIDE=${APP_CONF_OVERRIDE}